28 January 2013

Unique Art Projects 6

VINYL STICKERS

What you'll need: clear contact paper (i.e. shelf liner - mine is from the grocery store); Sharpie markers; tape; scissors; and a pattern to trace - I'm using Elsie Flannigan's adorable "Oh Snap" embroidery pattern (note: tracing a pattern is optional; for those with better drawing skills than I, feel free to draw directly onto your contact paper!)


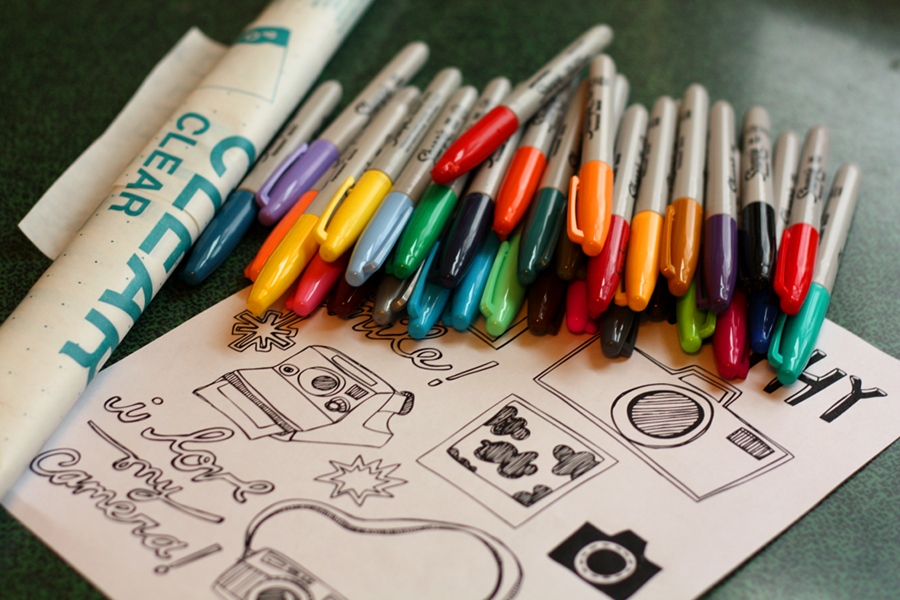
Step 1: cut a piece of contact paper slightly larger than the pattern you are going to trace. Tape it down on top of the pattern with small pieces of tape at the corners.


Step 2: use Sharpies to trace the pattern.


Step 3
: trim the excess contact paper.


Step 4
: now peel off the backing and embellish something with your new sticker! I used mine on a formerly-boring magazine storage file. I love these stickers because they can be easily repositioned and removed (great if you have commitment issues, haha). There are so many ways to use them - scrapbooking, cardmaking, embellishing just about anything - the sky's the limit here. Tomorrow I'll share a fun project in which they feature prominently!

Unique Art Projects 5


RAINBOW SPONGE PAINTING

In addition to the words “sun, cloud, and rain” we also added the word “rainbow”…
The pre-k children printed or traced the word “rainbow” on their paper first then it was time to get busy sponge painting a rainbow. First they squeezed a line of each color of paint on their sponges…
Once they had all the colors of paint on their sponges, they picked up the sponges and began to paint their rainbows…
The children swiped the sponges across their paper to create the rainbow…
The swiping motion can be a bit tricky for the children to understand, but they weren’t worried about creating perfect rainbows at this point. They were totally loving being able to paint with all those colors at one time…
Of course, swiping the sponge across the paper only one time wouldn’t be all that fun so the children added more paint and then swiped some more…
In the end, our rainbows still looked like rainbows for the most part…
Every rainbow began to take on its own unique style and look since each child had their own approach towards swiping the sponge across the page…
And after awhile, some of the children decided it might be quicker to add two colors of paint at a time to the sponge…
In the end, this process did not go exactly like I had thought it would. Instead, the children added their own preferences along the way but I am happy to report that the children enjoyed every minute of it…
And happy to report that our rainbows turned out quite lovely…
And quite unique!

Unique Art Projects 4

 THREE-PANEL, DANDELION WALL ART THAT LIGHTS UP!


Phase one of my dandelion project, re-purposing three previously painted canvases with navy blue acrylic paint. (Note the trash bags taped to the walls and floor of my "studio" aka dining room.)


Phase two: my dandelion design gets a fun green stem!


Phase three: white fuzz and seeds! I ended up with too many seeds, so some were omitted before the project was finished.


The grand finale! I stabbed some holes with a screw driver and backlit the canvases with 100 mini string lights (which were a bear to get to lay flat behind the canvas).


19 January 2013

Cool Optical illusions in Photos


Unique Art Projects 3

You can find inspiration in the simplest of everyday items if you know where to look. Photographs and sculptures of objects that we may take for granted because of their common appearance in our daily lives are especially impressive; simply because the artist has seen beauty where we normally may not take notice. In this collection we look at how various artists have taken some of these common items and transformed them into something greater. From kitchen utensils to trash to cars, let this roundup give you a fresh perspective on the normal items around you.

SPOONS

Created with spoons, this “metallic flower” is amazingly attractive.


FORKS

Who knew bent forks could be turned into a work of art?


PLATES

While not a completely new idea, this mosaic made of broken plates is quite unique in that it is in the shape and image of a pig.


KITCHEN APPLIANCES

Here’s a great idea for finding a purpose for your broken appliances.


TRASH

A new way to recycle beverage cans — smash them together to form shapes, such as silhouettes. Is this another way to say, “You are what you eat”?


BROKEN CLOCKS

This guitar made of broken clocks is amazingly beautiful in its own way.


RANDOM HOUSE WASTE

Have you been wanting some lawn sculptures but don’t want to spend the cash? Try sculpting your trash into your own cute lawn decor.


LICENSE PLATES
Who knew that old license plates could make such attractive wall hangings?


LAWN CHAIRS

Painting over old metal lawn chairs, old buckets, and other items that others might normally throw in the trash is a fun way to make a profit.


CARS

This demolished car is a part of the Saatchi Gallery located in London. Check out the website for some more truly unique art, many of which are made from everyday objects.


source

15 January 2013

Unique Art Projects 2

How To Make Cement Garden Stones.


Pick up some cement. Since I didn't want a giant bag, this little 1olb box from Michael's was perfect or have some delivered to you door.


I measured out 2.5lb on my handy food scale. Glad it's finally getting some use.


Add one cup water. Just enough to moisten all of the cement. No more.


Stir until no cement is left dry.


Prepare your mold. If you are using something inflexible these mini loaf pans, coat them with oil or Pam. If you are using a flexible plastic mold or milk carton or such, you shouldn't need to do so.


Add cement to pans and smooth top. Tap mold on hard surface to level and release trapped air, if possible.


If you are going to add tiles to your stone, now is the time to do so.


If you are just going to do the stamped "engraved" letters, set a timer for 30 minutes.


Maybe use this time to clean your tools. Clean cement outside you don't destroy your plumbing.


If you want your stone to look like ours, pick up these Stepping Stone Stamps.


Take a peek at your cement. If water is accumulating on top, dab it dry with a paper towel.


At about 30 minutes, scratch the surface with a toothpick, if it makes a "dry" mark, you are ready. If not, wait about 10-15 more minutes. I did one stone at 30 minutes and one at 40 minutes and the 40 minutes stone held its letter shapes better.
Stamp your letters. You can make small lines to use as guides, to stamp on a straight line or to find your center. Start with the center letters and work your way out to the edge.


Am I a nerd for thinking this is awesome? yes.


Keep stamping. If you mess up, you should be able to smooth out the surface and restamp. At 30 minutes, I was able to do so.


LOVE! But see how the little piece of the "E" broke?


Try to fix with a toothpick.


Worked pretty well!


Now smooth any unwanted marks or guidlines with a clean dry fingertip.


And that's it! Let it dry undisturbed for 24 hours.